

How To Draw Yourself As A Chibi
What'south a Chibi?
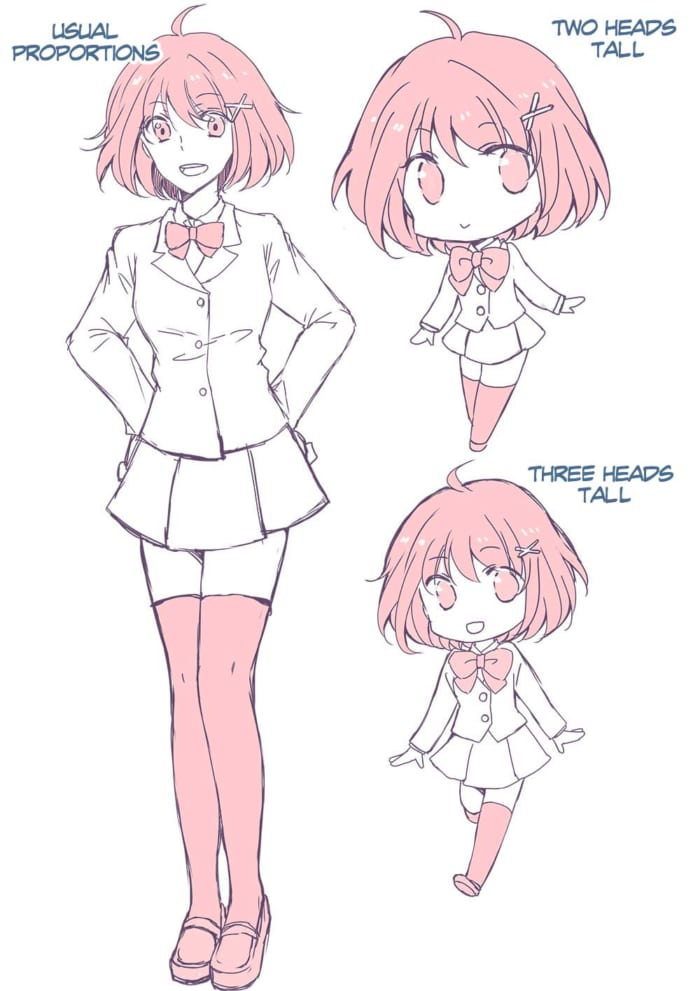
A chibi is a course of stylized character drawing that originates in Nihon. Chibi characters are usually between two and 4 heads alpine.
They are often used on merchandise for popular anime series. With huge, distinct facial expressions, they are also useful when expert at creating a fun or cute temper.
In this tutorial, I will teach y'all how to draw chibi characters.
Once yous know how to describe chibis, you lot may notice it much easier to describe these cute characters compared to typically proportioned characters.
Notes for Drawing Chibi Characters
● Chibis have uniform size and shape
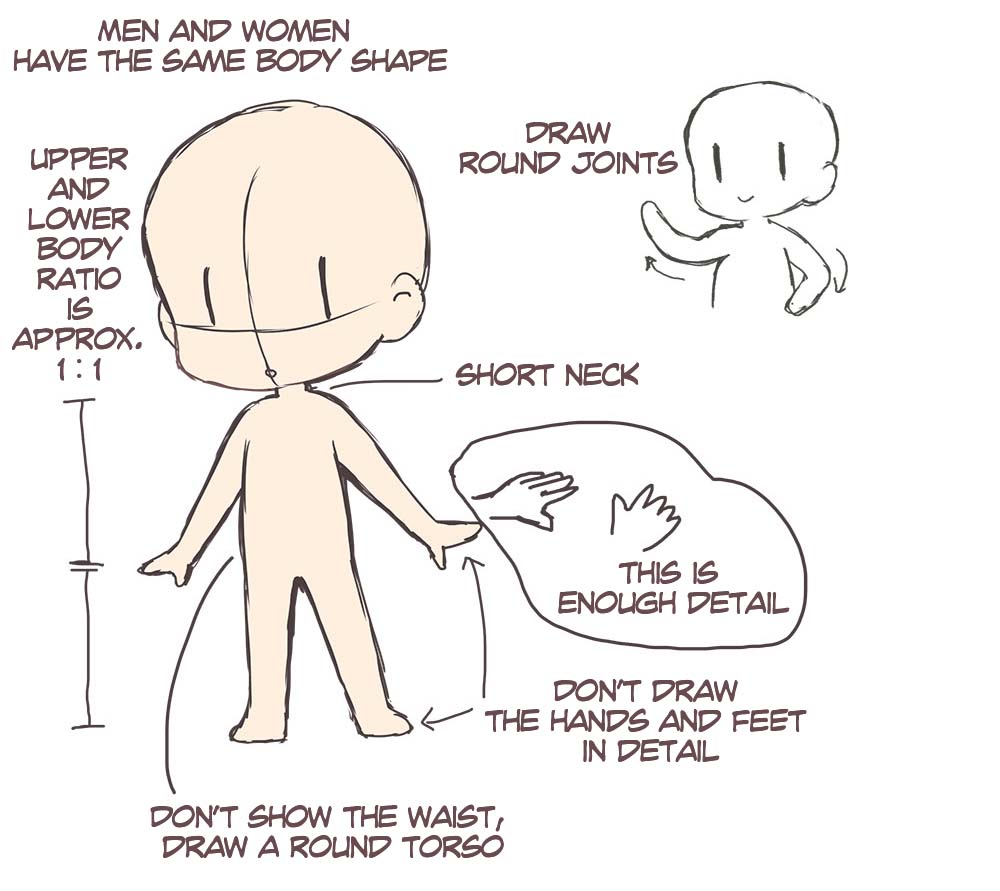
Nigh chibi characters are around the same size and body shape, regardless of the gender, face size, height, torso shape, and historic period of the original pattern.
In other words, a six-head-alpine girl and an 8-caput-tall human would have the same body shape equally a two- to iii-head-tall chibi graphic symbol.
If you larn the main points of drawing chibis, you lot can create any grapheme in this style.
● Find points that make the characters stand out
Even though chibi characters have the same basic body shape, y'all demand to notice a manner to differentiate betwixt multiple characters.
Yous can bring out the graphic symbol's personality past emphasizing the essential features of each grapheme. In particular, the eyes, hairstyle, and clothing.
●Focus on balance
Chibi characters can exist anywhere from ii to four heads tall, but I'll use two-head-alpine chibis for these examples.
There isn't a dominion on the proportions, and people will take dissimilar preferences on how they draw chibis. To start with, endeavor to acquire how to draw one particular proportion.
Once you learn how to draw a chibi, y'all can use the same principles to versions with slightly different body proportions.
In that location are a few differences based on the proportions, which we'll cover in the body section later on.
Drawing the caput
● The head is a sphere, not a circle
The first step of a chibi graphic symbol is the caput.
When cartoon a chibi graphic symbol, focus on the overall roundness and call up that the head is spherical.
Most people think of chibis equally a 2d stylization. But actually, in that location are many chibi anime dolls equally well, such as "Nendoroid" from Good Grinning Visitor, Inc. Try to think of your chibi graphic symbol in a 3D infinite.
The caput is round and large compared to the torso.
….In fact, so big that I'm not sure how the head is supported!
A chibi graphic symbol with a sense of depth will appear much cuter, so keep the 3D space in mind every bit you describe.
●Drawing the head (two-head-tall version)
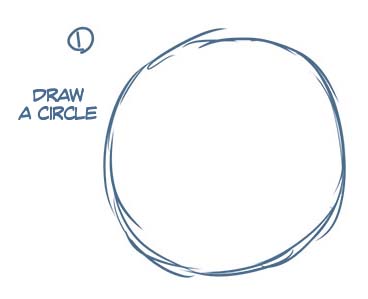
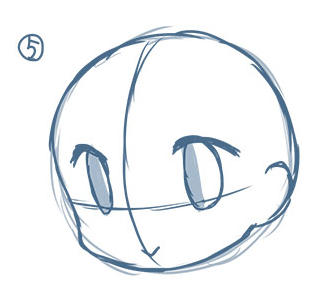
one. Draw a circle
First, draw the crude outline as a circle.
2. Draw along the circle
Draw the outline of the caput around the circle.
1 feature that differentiates a chibi from a typical human is the lack of sharp edges around the jawline. I mentioned earlier that you should focus on the roundness, as most parts of chibi character are soft and round. I supplant the sharp jawline with a smooth bend.

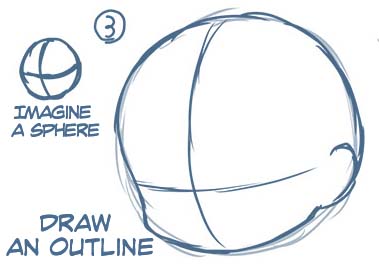
3. Draw guides
Describe guide lines for placing the optics and oral fissure.
Every bit I mentioned earlier, since the caput is a sphere, draw the guide post-obit the shape of a ball instead of flat paper. (You tin imagine the curve of the latitude and longitude lines of the world as an example of this.) The eyes of a chibi are quite large, and so place the horizontal line for the eyes slightly lower.
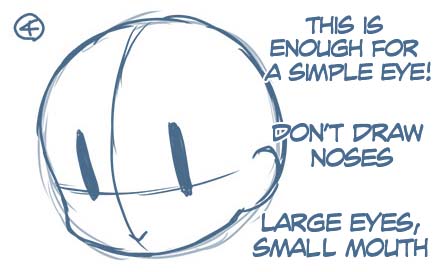
4. Depict the eyes and mouth
Draw the graphic symbol's optics and oral cavity. The eyes of a chibi express the most emotion, so draw them very large.
For some comical expressions, the eyes are fatigued only with straight lines.
The mouth is small-scale, and y'all can often omit drawing the nose. You tin likewise use a pocket-sized dot to represent the olfactory organ.
Since I will alter all precipitous edges into a curve, I omit sharp parts such as the nose.
5. Describe details of the eyes
Make the eyes neater and add some more detail compared to the previous simple eyes.
6. Draw the pilus
Depict some hair for your chibi. Starting time, draw a voluminous shape of the hair effectually the outline of the head.
It's a adept thought to apply a simplified hairstyle compared to the regular-sized character. Use soft tips for the ends of the hair.
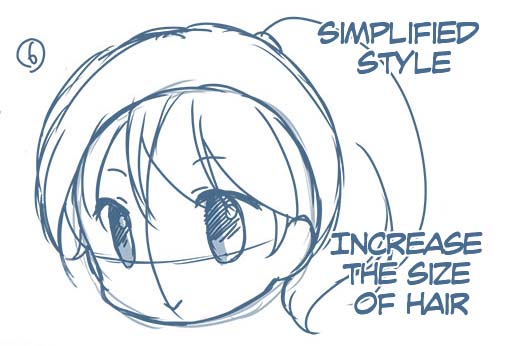
Now the head is finished.
Compared to a regular face, keep the lines as unproblematic as possible.
The central to creating a chibi grapheme is to reduce information while leaving the key features.
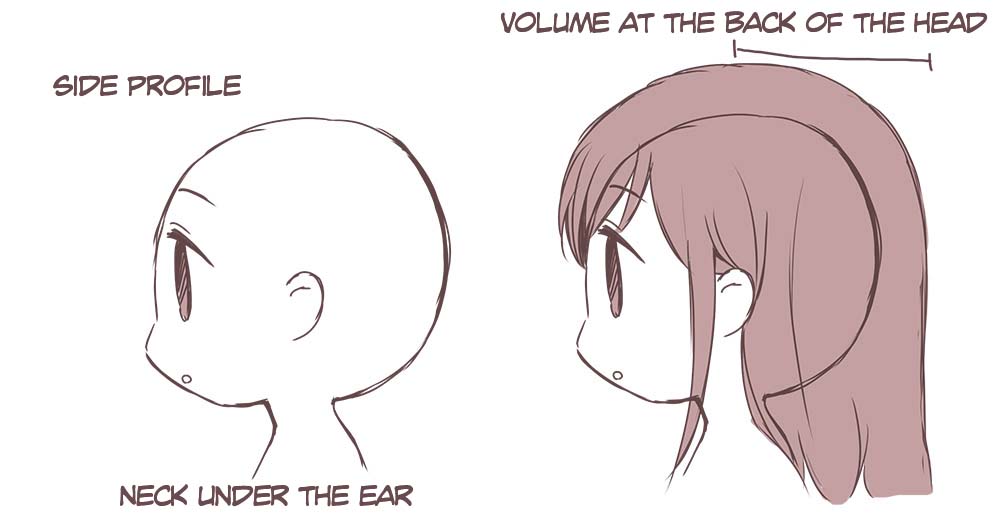
When drawing the side contour, keep in heed the spherical shape of the back of the head.
The position of the neck is slightly catchy when cartoon a side profile. You tin can place the neck under the ear.
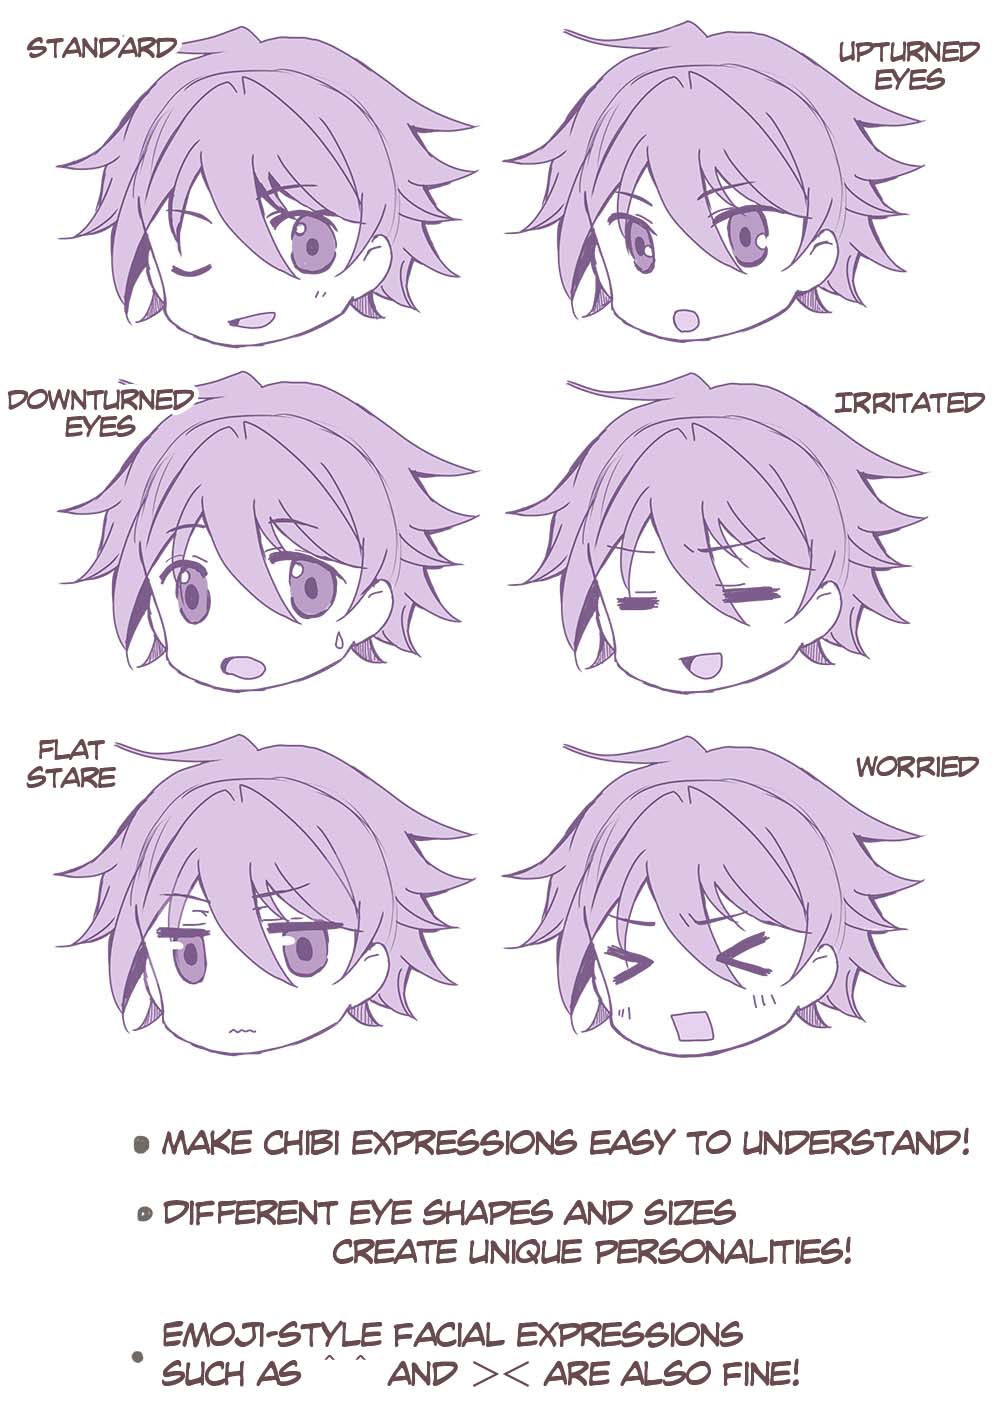
● Emotion comes from the optics
Chibis have huge optics that express their characteristics and feelings. Does the character have upturned or downturned optics? Does the character accept round optics or thin eyes?
The optics are the nearly of import, as they can create a totally dissimilar event with expressions.
Chibis tin take exaggerated features for a comedic outcome, so don't be afraid to push button their expressions to the extreme.
Since they are and so tiny, y'all can bring out the childish aspects of the characters.
Drawing the Torso
● Ignore the skeleton when cartoon the torso
When cartoon a chibi torso, focus on softness, and ignore the usual rules of bones and joints.
When I say "softness," I mean a squishy and soft feeling similar a stuffed beast. Y'all don't demand to worry too much almost the skeleton frame or joints.
Of course, knowing the nuts of how the body works will touch the drawing, but y'all do not have to exist strictly bound to these principles. Since the body is already besides small to support the head, you tin can ignore some rules of physics when yous draw. This freedom is ane advantage of chibi characters.
● Drawing the torso
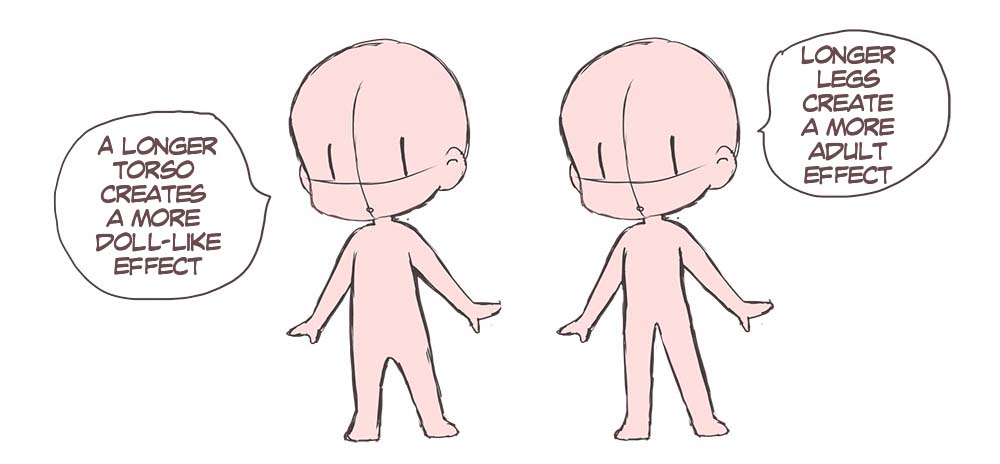
A 1:1 balance between the body and legs will create a well-balanced body.
With that said, you lot don't need to obey any specific rules for chibi characters!
A longer torso will brand the chibi look cuter and more doll-like.
Longer legs create a more than mature effect, even with the same head-to-body ratio.
Choose whichever proportions you lot prefer.
・ Cervix
The neck tin can disappear with a two-head-tall grapheme.
If you draw the neck, go along it short and thin.
You should omit any unneeded parts on a chibi graphic symbol, so you don't have to draw the cervix.
Yet, make certain the head and trunk connect at the correct position.
・ Shoulders
Drawing broad shoulders creates a more rugged issue and reduces the cuteness.
Sloping shoulders suit both male and female chibi characters.
・ Torso
On a commonly-sized drawing, a woman might have a defined figure, but you can ignore those features for a chibi character.
If the character has some defining characteristic, you can depict that.
Draw a simple torso that appearsround and soft.
The primary element of chibi characters is cuteness. A detailed body shape would be too realistic, so they are typically fatigued with a childlike torso.
・Arms and legs
Slender limbs will brand the grapheme await besides mature, so go on the arms and legs relatively thick, ignoring realism with the joints and muscles.
Yous can make the legs thinner towards the feet, or keep the thickness consistent.
Y'all tin can decide whether or not to draw the fingers and toes, but the chibi tin look a piffling odd with detailed fingers. I recommend dividing the manus into two shapes: the thumb and the 4 fingers. You can consider drawing the hands and fingers in more particular if the grapheme is three heads alpine.
Annotation: When cartoon a three-caput-tall body, you should define the shape more conspicuously than a two-caput-tall body.
In particular, by drawing curves effectually the chest, waist, and hip, the grapheme volition look more mature than with a two-head-tall body.
Express more than personality!
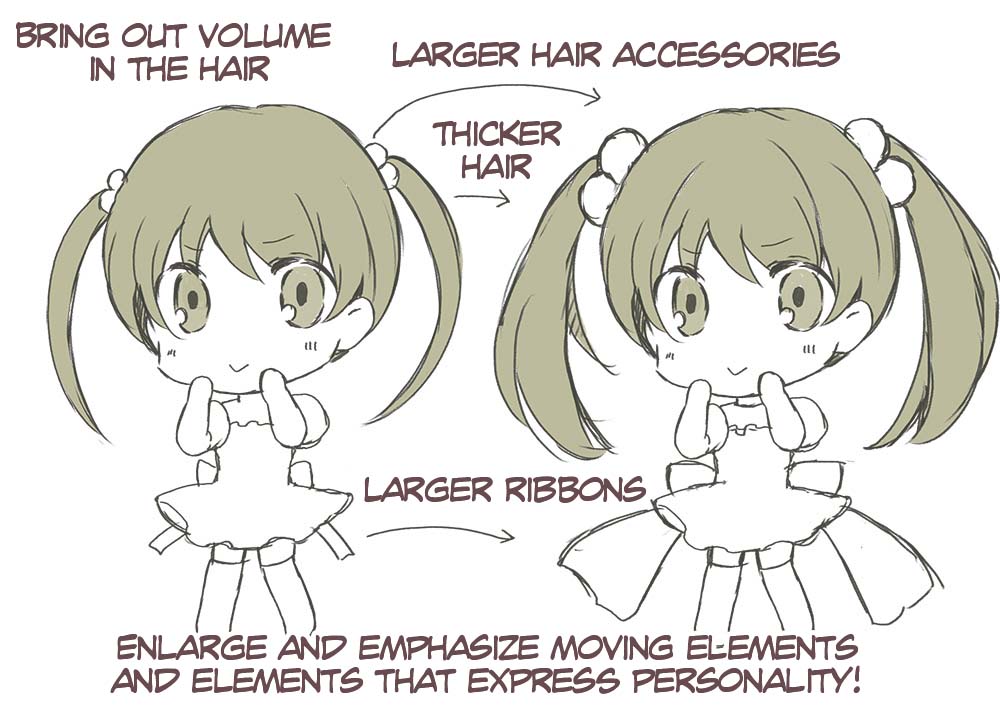
● Maximize and emphasis unique features
Now that y'all can draw a chibi, let's focus on bringing out the graphic symbol'southward personality.
Mini characters have identical body shapes, and so it tin can be hard to distinguish between them at a single glance. How tin can we differentiate betwixt characters? The answer is, of course, exaggerate the graphic symbol's features!
For instance, if the graphic symbol wears glasses, draw them larger. If the character has long pilus, make it even longer. The same applies to the dress of the character.
In this manner, yous tin clearly distinguish the different characters you lot draw.
Changing the hair is useful in many cases.
If you increase the amount of hair, make it resist gravity, or make the graphic symbol'due south hairstyle more than unique, it volition change the graphic symbol'due south advent.
Did you enjoy my tutorial?
As I mentioned at the beginning, if you lot learn how to design a chibi character by yourself, yous volition be able to draw more characters with the same trunk shape. You can also apply the tips for drawing the confront and the body to other chibi characters.
Based on the aforementioned body shape, you can differentiate between characters by drawing dissimilar hairstyles, heart shapes, and clothes.
And since chibi characters can ignore gravity, you tin can draw poses that are unremarkably impossible.
Always prioritize the cuteness of the character over the realism of the pose.
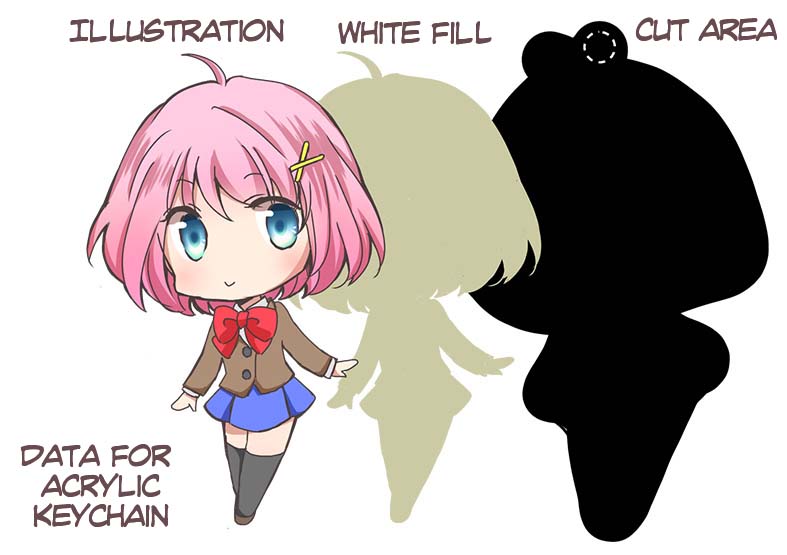
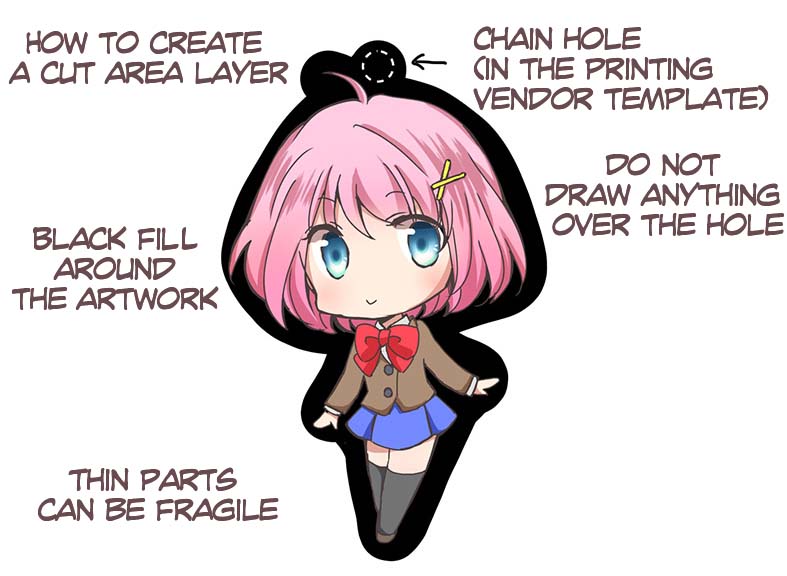
BONUS: How to create accessories
Creating a zine or a comic is pretty complex, so why not start with creating small items?
Today, I will explain how to set art for acrylic keychains, which are like shooting fish in a barrel to make and look cute with chibi characters!
(You tin make almost other acrylic goods, such as acrylic stands, in the same fashion.)
An acrylic keychain commonly requires iii split up information, depending on the printing vendor template.
Open up the template, and paste these images on separate layers, usually the following:
・Artwork
・White fill
・Cut area
So, ship the data to the printing vendor.
For the artwork , choose the information yous want to use.
At the top, bespeak where to place the hole for the keyring chain.
Brand sure you don't draw anything over the hole.
The white fill is the base color under the illustration.
Without this white base of operations, the analogy will be printed directly on the transparent acrylic, which makes the colors appear translucent and hard to see.
To print your analogy equally you created it, make certain to create a white fill layer.
It is easy to create this data – create a duplicate of the illustration layer and fill information technology with a solid color. The printing vendor will print this layer in white.
Because it sits under the illustration, the shape should exist a silhouette of the artwork. If you desire certain parts to appear transparent, you can remove the white make full on those parts.
Cutting area shows where the acrylic board volition exist cut.
The layer can be purely black. Make full the expanse surrounding the analogy in black.
Avoid creating a complex cutting border, as the keyring maker may not exist able to cutting it.
One time you know how to prepare information for an acrylic keychain, you tin can make other acrylic accessories in the aforementioned way!
Brand sure you sympathise the size of each particular.

Source: https://www.clipstudio.net/how-to-draw/archives/155423
Posted by: catalanoource1962.blogspot.com
0 Response to "How To Draw Yourself As A Chibi"
Post a Comment